Posts Tagged ‘hive’

Winter is over and here come the girls….


Its been relatively quiet down at the apiary over the winter months with the bees mostly staying in their hives even if they did not cluster for long periods due to the warm weather we experienced again in the south east.

I did not feed any syrup in August following the honey removal last year as it was such a good year that the bees were still bringing in pollen and nectar late into the season and I had left a good amount of honey on the hives as this has to be better for them than a sugar substitute! I checked back on the bees around new year when I also applied oxalic acid, dribbled between the frames to help control the mite whilst the colony was without sealed brood, and gave each hive some bee candy above the crown board as an insurance policy against starvation. Its always nice to see the girls doing well at this stage but I am quite aware that this is never a guaranteed sign that they will all make it into spring.

The bees were still quite active and a few followed me when I left the apiary which was sad knowing that these would soon chill and fail to find their way back home….

View across the new apiary site in April 2015

View across the new apiary site in April 2015

My bee buddy Paul and I also moved the apiary to a new location around new year, it was only a few hundred meters across the land so that the bees will now get more light earlier in the day as they had become overshadowed by the tress rapidly filling the skyline around their old homestead. Winter is one of the few times you can move the hives like this, at other times you have to stick to the ‘less than 3 feet or more than 3 miles’ rule to prevent the bees returning to the original hive location and clustering on the ground.

We strapped the hives but didn’t block the entrances and wheeled them carefully across the bumpy ground in a wheelbarrow. All the bees behaved and stayed indoors until we got to the final hive with the feisty black British queen (these are my best honey makers) and they came streaming out en-mass and found a hole in Paul’s gloves to let him know about their disapproval, needless to say I ended up moving that one on my own.

Bees landing at the hive

I returned to lift the roofs and check how the bees were getting on in February and a couple of hives had started to nibble the candy, despite still having some honey in the outside frames, just goes to show that they would rather go up than sideways in their search for supplies.

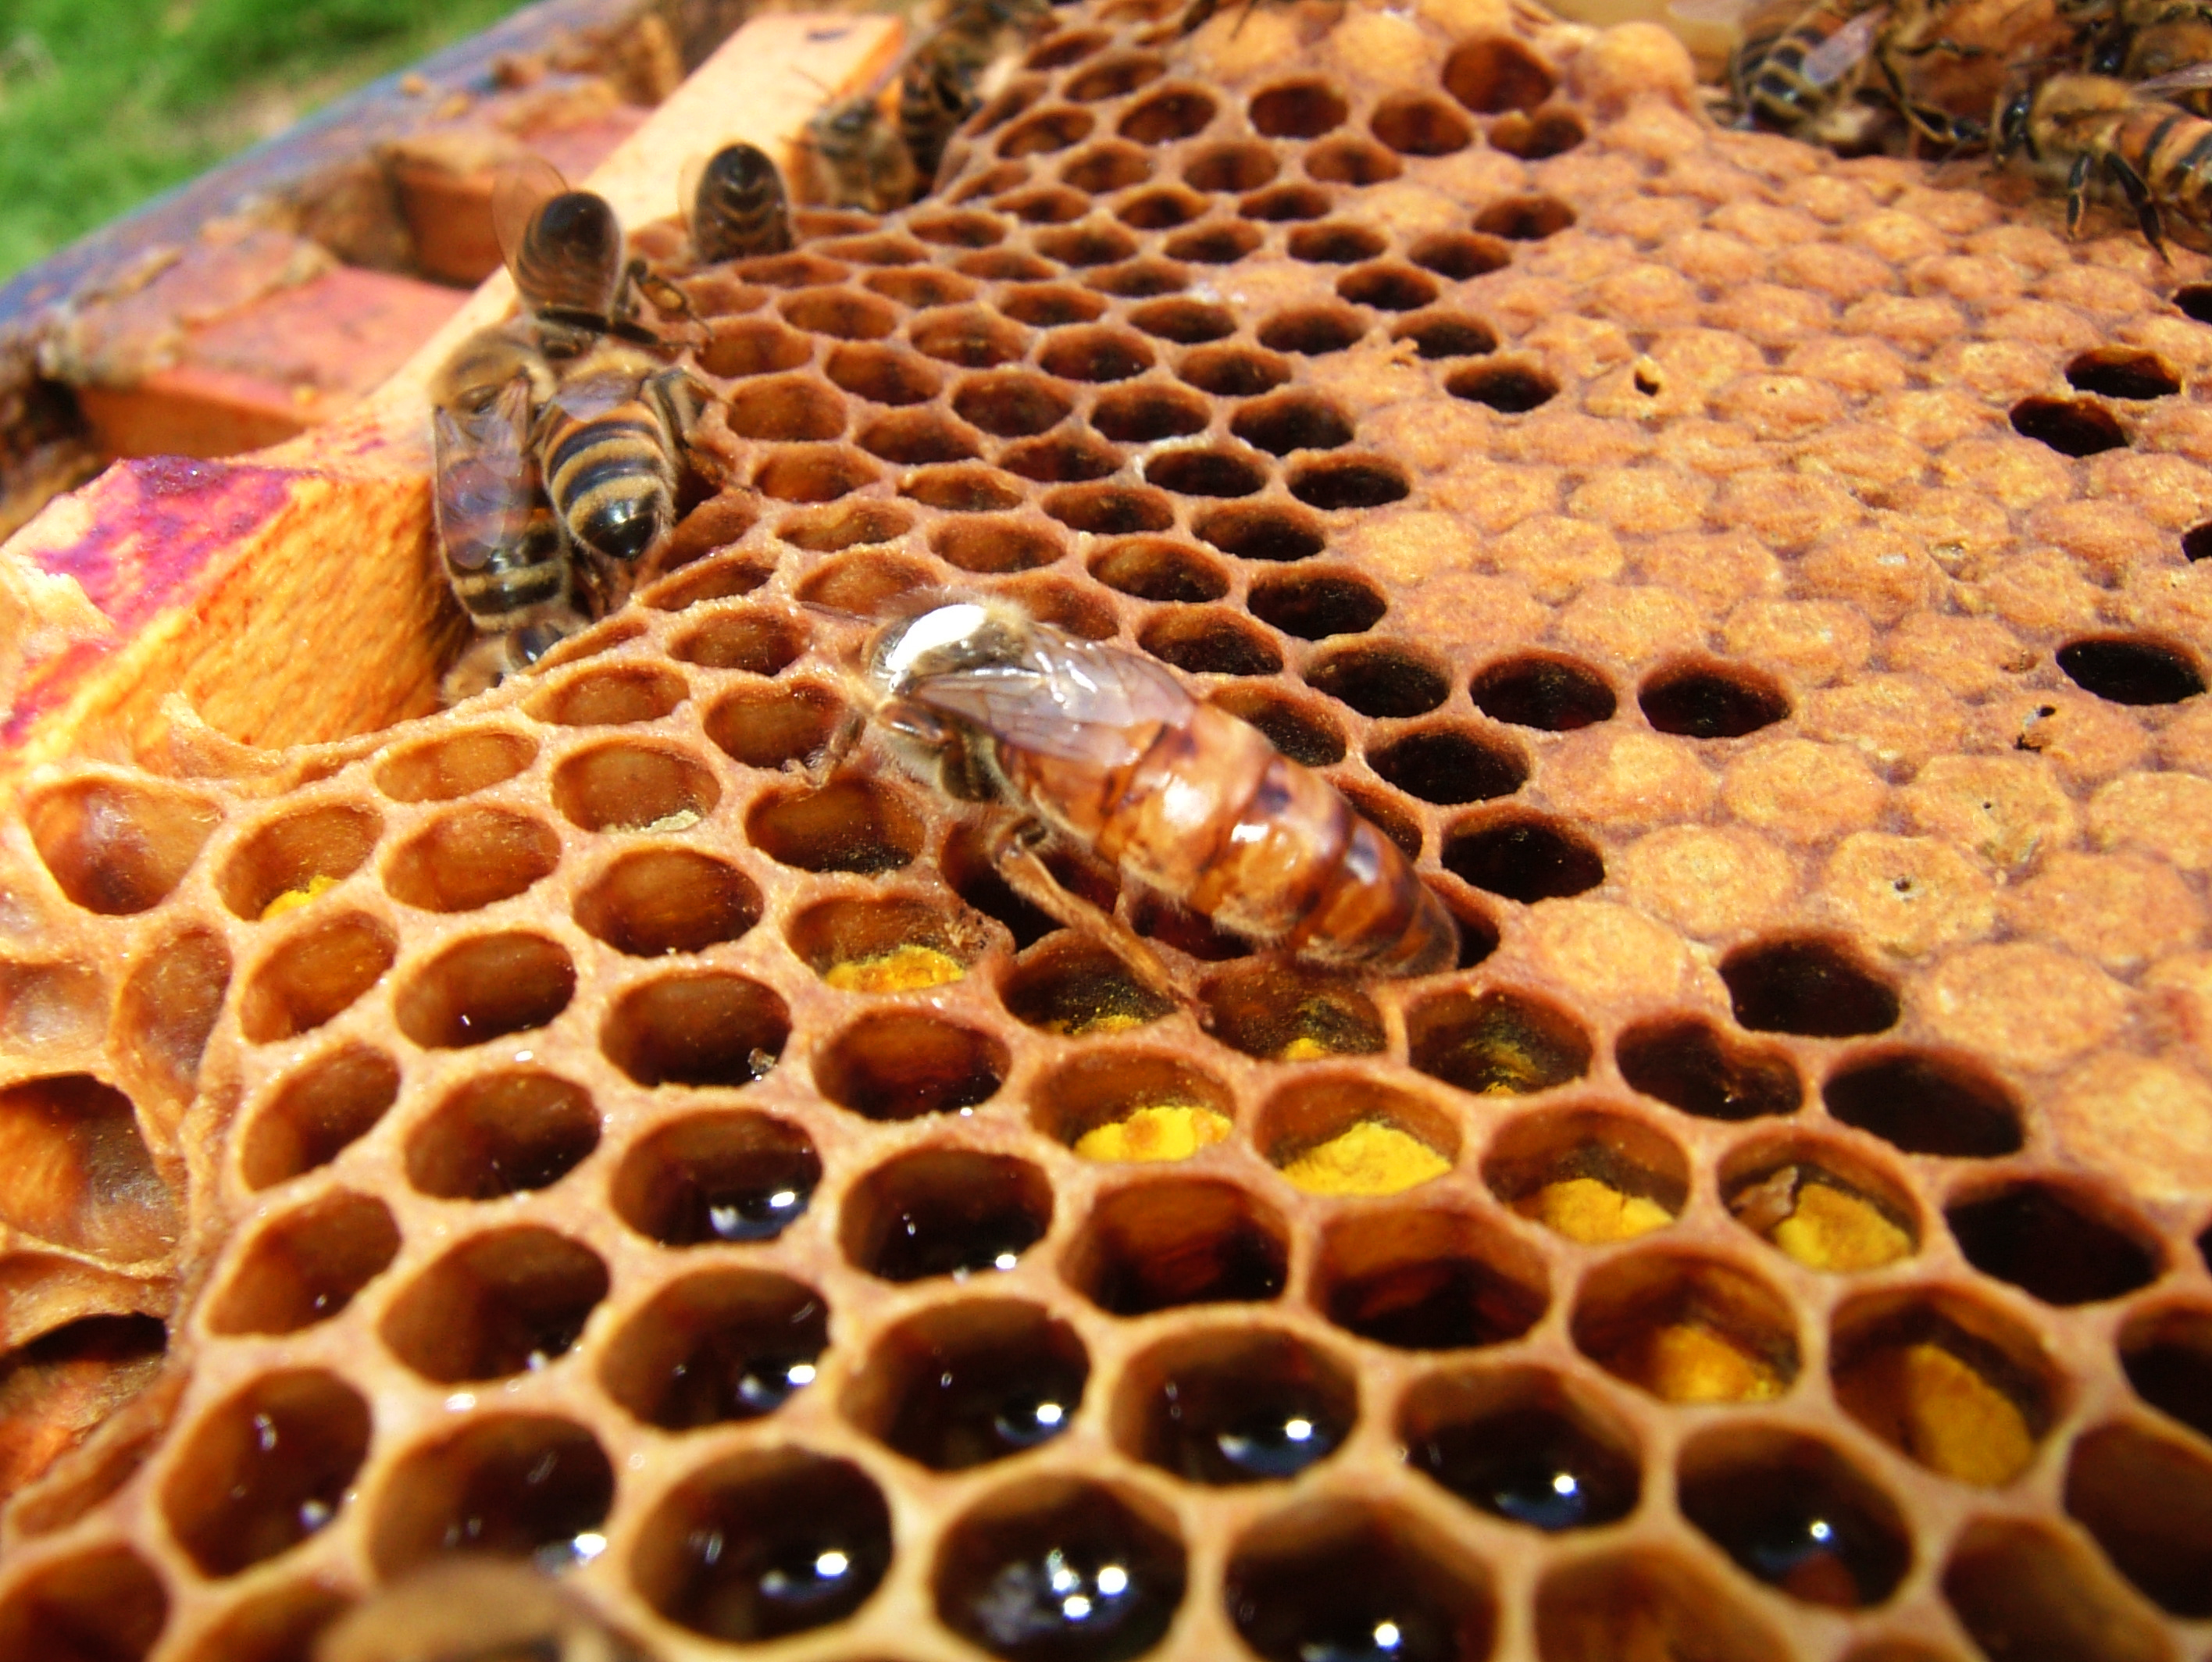
Early April saw a mini heatwave across the UK with above average temperatures and sunshine hours and the bees didn’t waste a minute of it. The bees have been very busy and nearly all the hives had 8 or 9 frames of brood and pollen across the ‘brood and half’ system that I run. With colonies this strong it was definitely time to add the first supers to give the bees more room for stores, prevent hive congestion and maybe delay the inevitable swarming for a couple more weeks whilst I get my backup gear sorted and ready for use.

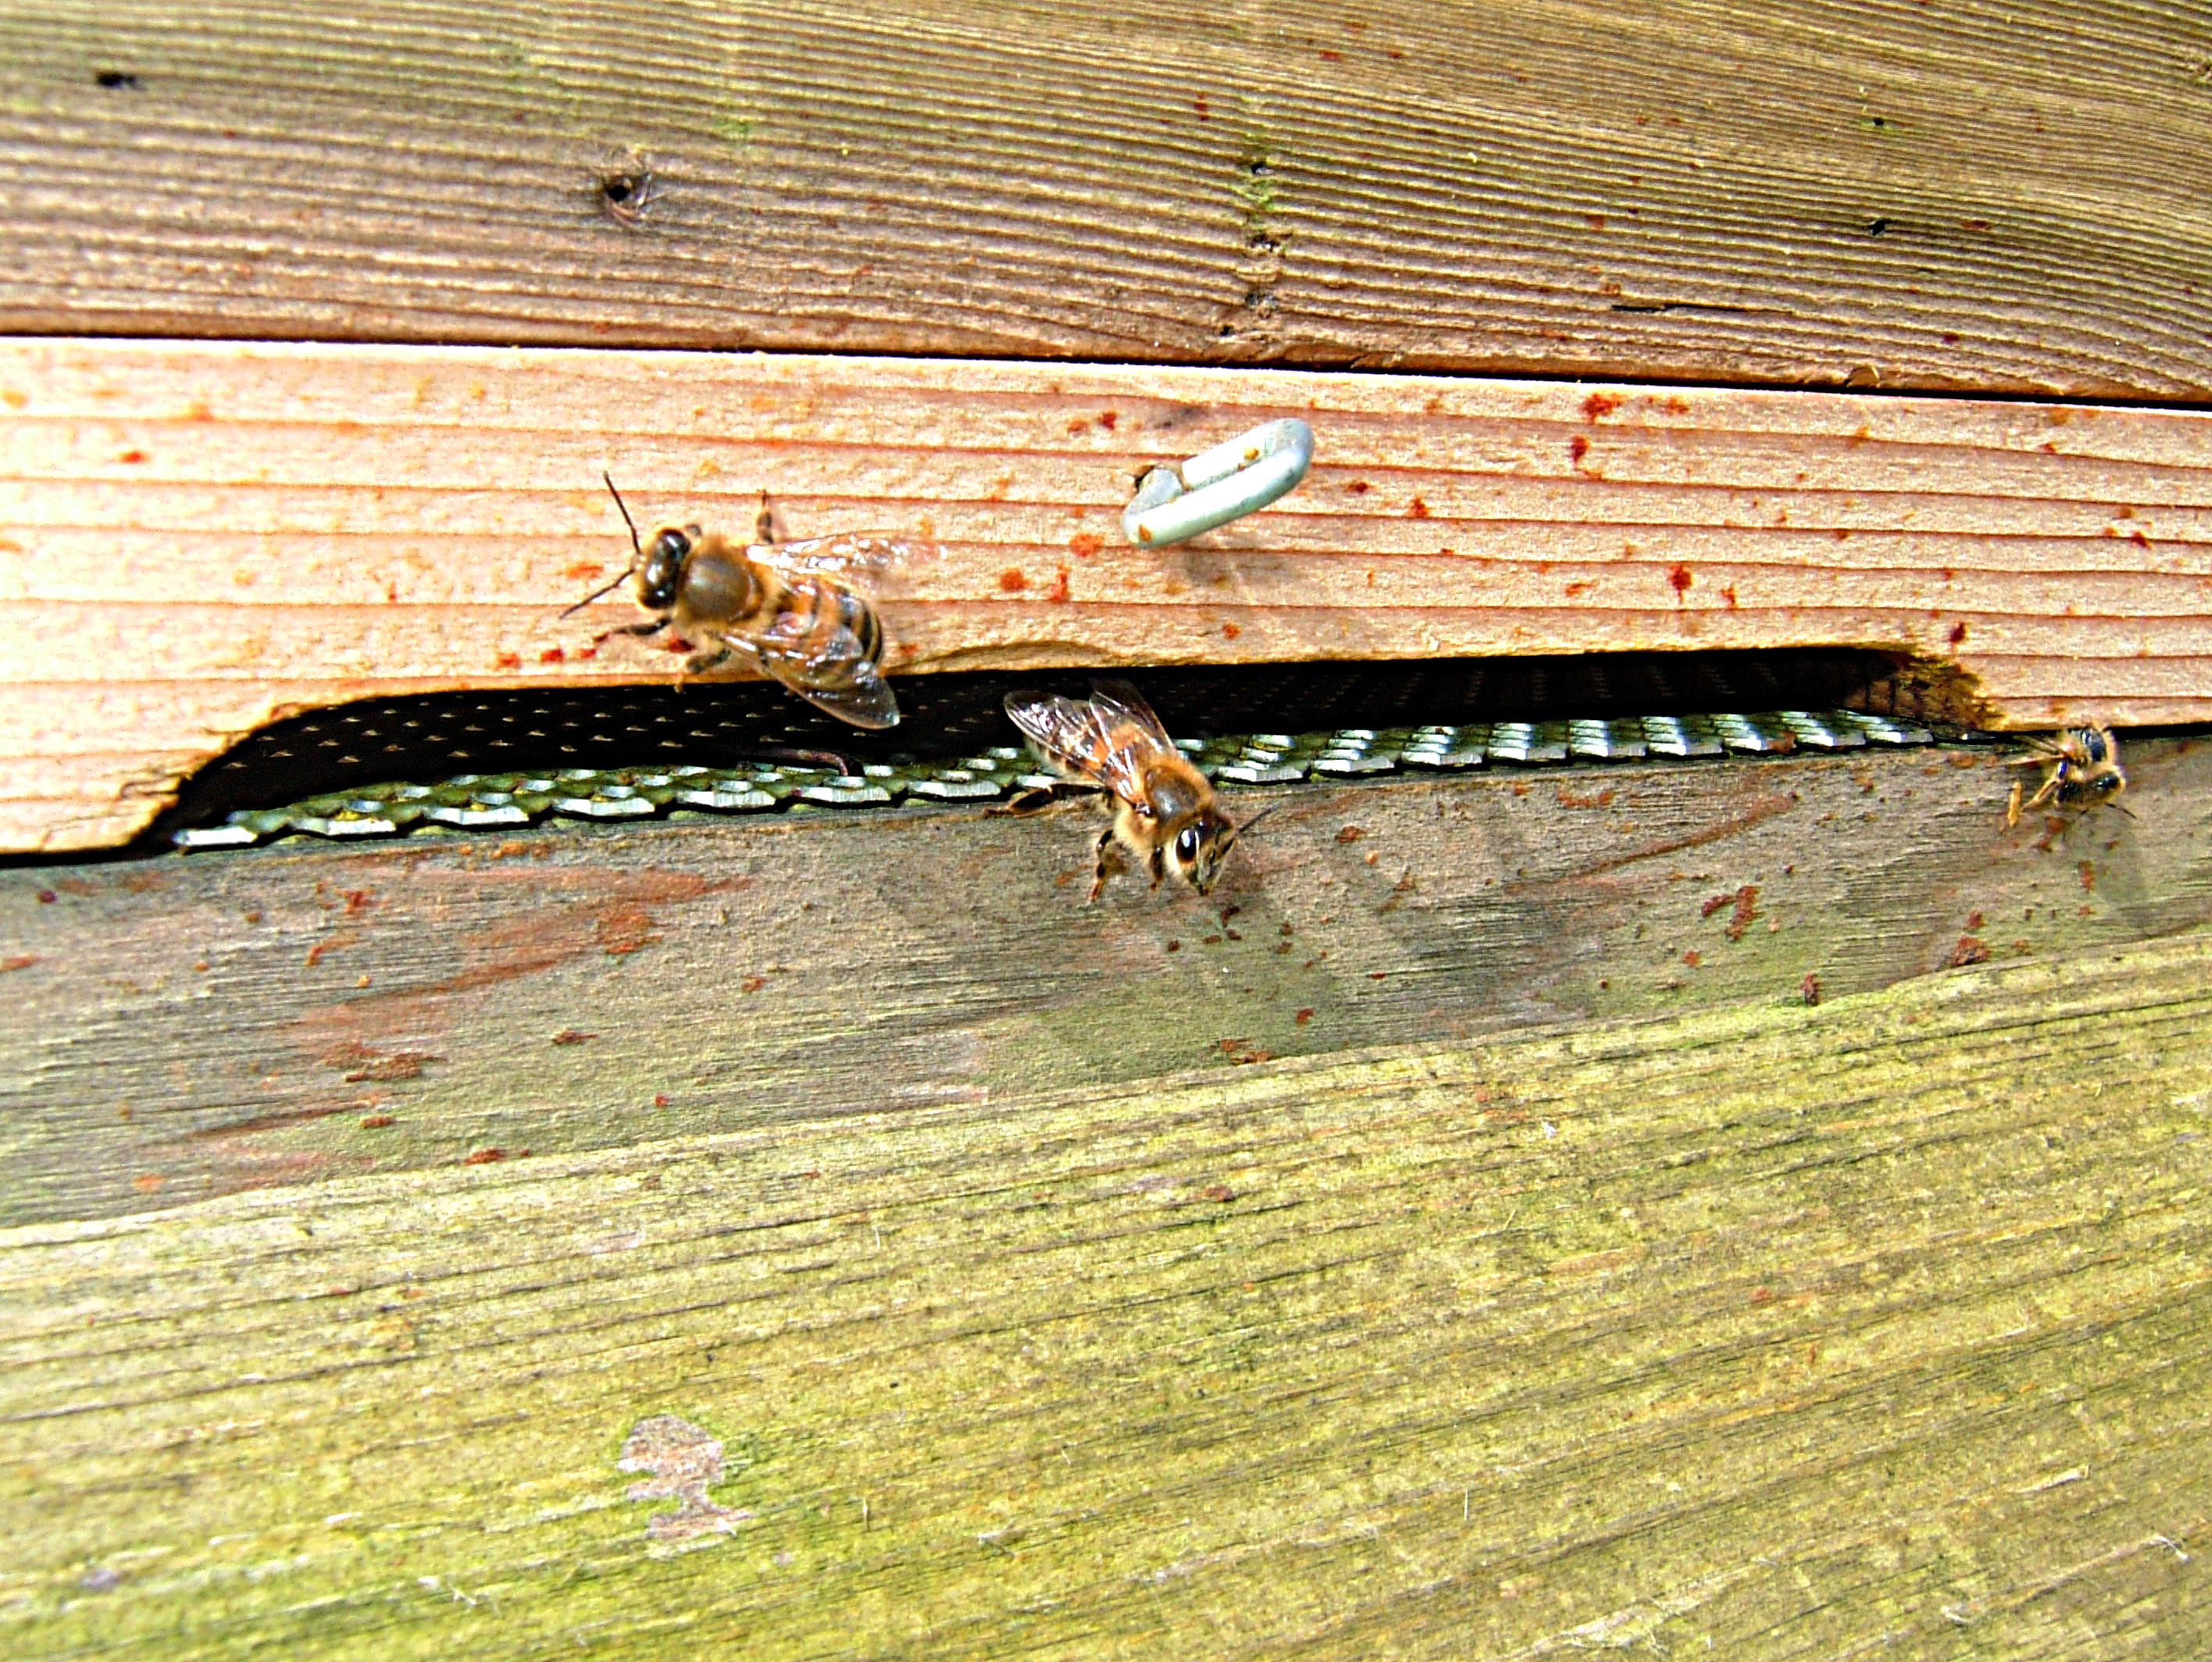
As a beekeeper with a busy life, young family and full time employment I don’t often get the opportunity to simply stand back and watch the bees but I recently took some time to photograph the bees activity at the apiary and just enjoy watching them in flight bringing in the spring pollen, you can learn so much about the strength and health of a colony through observation at the entrance and its far less intrusive to the bees than opening the hive up. I hope to get the time to do this a bit more often in the future….

landing gear down

landing gear down

Lots of activity at the hive entrance

Lots of activity at the hive entrance

The weather has become more unsettled, with cooler wet and windy weather across the UK this week and the girls are not flying as much but I have no doubt that they are still just as busy indoors and planning the plot to their own ‘game of thrones’ so now I am just waiting for a break in the rain to try and catch up with them….

As ever I will be adding to this blog as and when time allows and I am not actually elsewhere or with the bees in 2015, thank you for taking the time to read my ramblings and for your continuing comments and questions – this makes it all worth while for me as the writer….

I can also be found at @danieljmarsh on twitter or British Beekeepers page on Facebook.

Guard bee at the hive entrance

A worker bee guarding the hive entrance

Products of the hive – cleaning and using bees wax


IMG_0613

Having previously written about both honey and the use of bee venom I thought it would be good to mention another product of the hive and share a bit of what I do with the wax that I accumulate from the hives. Having kept bees for several years I have ended up with quite a lot of wax from old brood frames and honey supers, cell cappings removed during the honey extraction and all those scrapings and bits of brace comb that the bees seem to build whenever they spot a little bit of space accidentally left in the hive by the careless beekeeper. The colour of the wax varies from near white cappings on the fresh honey combs to dark brown, heavily ‘propolised’, wax in the brood frames that are just a few years old.

Using the uncapping fork

clean wax cappings being removed from cells during honey extraction

Comb is quite bulky to store and often contains other bits and pieces from the hives so I initially melt this down to reduce the size and start the cleaning process. I use a large pan with about 2″ of water from the garden rain butt, bring it to the boil then reduce to a simmer and add my wax lumps. Bees wax has a relatively low melting point of around 62 – 64 degrees centigrade so this doesn’t take long and as it reduces the bulk, I can often get a large bucket of comb melted down in a single saucepan. I then leave this outside to cool over a couple of days, the wax ‘shrinks’ away from the sides of the pan so it is easy to remove and all the non-wax components sink to the base giving a layer of ‘crud’ which can easily be removed with a large knife and disposed of. This then leaves me with a round ‘cake’ of wax that I can store somewhere dry until I am ready to use it.

These wax cakes are then broken up using a large wooden mallet and melted down a second time in fresh rain water, I then pass the wax through a muslin cloth. To make this easier I cut a square of cloth to fit over a plastic plant pot that I have removed the base from, I attach the cloth with an elastic band to make a filter that is easy to use when I also have a large pan of hot wax to juggle. The wax is poured through this filter into containers that act as ‘moulds’ and again allowed to cool slowly. I now have wax that I consider to be clean enough for use in candle making.

A wax 'cake' that has been filtered through a muslin cloth filter

A clean wax ‘cake’ that has been filtered through a muslin cloth filter

In the past I have made tapered candles through ‘dipping’ wicks repeatedly into hot vats of wax but although great fun this is a very slow process,  traditionally families would have got together to share a meal with all the generations helping out with this task. For the purpose of this blog though I am looking at using a candle mould to make some small candles.

Wax is best heated using a double boiler, you can buy all sorts of devices for this purpose but to be honest if you are only using small amounts a recycled tin can in a pan of boiling water works very well. I use needle nose pliers to flatten the ‘lip’ and create a pouring spout to control the wax and reduce wastage (and cleaning up afterwards).

I have also seen YouTube videos where wax is melted in a microwave in a pyrex jug and guess this works very well if you have an old microwave and jug that you don’t mind using.

Melting wax in a 'double boiler' using a recycled can and pan of hot water

Melting wax in a ‘double boiler’ using a recycled can and pan of hot water

The silicon mould that I am using was purchased from Thornes beekeeping suppliers, although you can buy moulds from other bee suppliers, online from specialist candle making websites and very cheaply on eBay from China. You initially need to cut a partial slit down each side of the mould to ease the removal of the candle when made, then fix elastic bands around the mould to hold it back together again, feed the wick through the base (I use a skewer for this) then attach something to hold the wick in place – a hairpin is perfect for this.

Mould prepared for candle making

Mould prepared for candle making with wick fed from the base

Once the wax in the double boiler has melted it is simply a case of carefully filling the mould to the top and leaving it to set, for these small bee light candles it only took around 15 – 20 minutes to set enough for removal but obviously larger candles will take significantly longer.

Pouring the molten wax into the mould (slight spillage as poured left handed whilst using the camera)

Pouring the molten wax into the mould (slight spillage as poured left handed whilst using the camera)

Once the candle has had time to set and been carefully removed from the mould you simply cut the wick and re-attach the hairpin ready for the next candle to be made.

We take so much for granted these days and it is cheap and easy to buy a packet of paraffin wax tea lights but these will not have had the journey from bees to hive, then cleaned and moulded into shape. There is no real value to selling them as a product as the price would never reflect the time or effort of the beekeeper in producing individual  candles but there is a certain pride with putting them out as homemade when friends come round for dinner.

IMG_0612

There are of course many other uses for bees wax, from cosmetics through to cleaning products, so I would be interested to hear from other beekeepers as to how you use your wax.

I hope to keep adding to this blog as and when time allows in 2014, thank you for taking the time to read my ramblings your continuing comments and questions – this makes it all worth while for me as the writer….

I can also be found at @danieljmarsh on twitter or British Beekeepers page on Facebook.

Dan

June arrives bringing warmer weather but also swarms galore


Apiary - June 2013

At the apiary – June 2013

It’s been a cold and slow start to the beekeeping year, allegedly the coldest in 46 years and one of the 4 coldest since records began in 1910 and all this is on top of the appalling wet year that we had in 2012. Beekeepers all over the UK recorded above normal losses of bees during the extended winter months and although the coverage about pesticide use and bee loss has continued to dominate the  media many of these bees were simply lost to starvation and the cold weather. I sadly also lost a colony as I reported earlier in the year despite there being fresh bee candy in the hive literally millimeters above the bees…

Healthy bees in may as the colony starts to enlarge

Healthy bees at the hive entrance in may as the colony starts to enlarge

So the flowers were late, I fed my bees a light syrup as spring arrived and the colonies expanded really fast this year – it was great to see and as the belated wild blooms broke through the workers were ready to take advantage and I have had great joy watching the air around the apiary alive with pollen laden bees making their return flights back to the hives during the warmer and sunny days.

During my recent inspections I have seen large and healthy colonies, with the ‘brood and a half’ hive formation full of eggs, brood and stores with no room to spare. My first honey supers went on back in May and these are also now full to overflowing, although the honey is not yet capped. This weekend I added a second super to one hive with a smile as this was done a lot later last year so I feel very optimistic  that  the bees are having a better year already… I certainly hope so!

Chalk brood ejected from the hive

Chalk brood ejected from the hive

Hive checks back in May did reveal a higher level of chalk brood than I had previously seen, I wasn’t worried but interested to know why – then whilst reading another great beekeeping blog – ‘Adventuresinbeeland’s Blog by Emily Heath about her beekeeping in Ealing, West London, she happened to mention chalkbrood in her question/answer section of her informative revision notes for the BBKA exams:

Chalkbrood is an extremely common brood disease which is often present at low levels in colonies. It is thought to become a noticeable problem when the colony is weak and when levels of carbon dioxide rise above normal, because the bees are failing to maintain the correct conditions in the hive. It is also linked to stresses such as insufficient nurse bees, pollen shortage and the presence of sac brood.

Chalk brood is caused by a fungus named Ascosphaera apis. This delightful organism begins to germinate when a larva takes in its spores with its food. Inside the gut, the spores start to grow, producing multiple branches of fine cotton-like threads. These break through the gut wall and continue to grow throughout the body of the poor larva, until eventually it becomes “a swollen mass of fluffy white fungus with a small yellow lump where its head used to be“, as Celia Davis puts it in her excellent book ‘The Honey Bee Around & About’ (2007).

The infected larva dries to a hard chalk-like lump called a ‘mummy’, which can be white, grey or black. These will rattle when the comb is shaken. Death occurs after the cells have been sealed, so workers will tear the cappings open to remove the mummies and dispose of them outside the hive. Unfortunately the mummy spores are sticky and will attach to the bees, causing them to infect larvae when they re-enter the hive. Yet another reason to change brood comb regularly – the spores are resistant to heat and have a life of between 3-38 years.

Like chilled brood, beekeepers are most likely to see chalk brood in the spring when colonies are expanding the brood nest rapidly, but do not yet have a large adult bee population. Even if the resulting chilling is not sufficient to kill the larvae, it seems to encourage the growth of the Ascosphaera fungus.

And as the highlighted section indicates maybe my early feeding and rapid colony expansion was out of sync with the availability pollen to feed the brood once the bees had used that stored over winter in the hives. I guess I could have used a pollen substitute as a supplementary feed (there are many recipes online as well as those commercially produced) but as it is the bees effectively removed all the chalkbrood and it does not seem to have affected them or their ability to fill the hive with brood again and it no longer seems to be a problem at all. Interestingly it also only affected one hive in the apiary.

Buckfast queen back in May, plump and laying very well

Buckfast queen back in May, plump and egg-laying very well

So the colonies are healthy, the queens are fruitful and the number of bees in each hive has rapidly expanded, so much so that the hives had become congested by early June so it was a given that they would try to swarm as soon as the weather improved! My black british queen was first to go – I checked the hive and didn’t spot anything (nor the queen) then came back 10 days later and bang – three fully formed capped queen cells and a fourth in the making – I attempted to carry out an artificial swarm but this was hampered by a sudden downfall of rain and despite going through the hive three times I just couldn’t find that elusive queen so had to assume she had already gone, which kind of defeats the object of an artificial swarm so I moved the whole original hive back into its original location and have now left it to its own devices. The first visual swarm recorded at the apiary this year, and collected by my bee buddy Paul, was likely to have been the first of these virgin queens leaving with a cast or secondary swarm.

Queen in a queen clip

Queen (marked white on left) visible in a queen clip during artificial swarm

Last Friday I checked my  second hive and sure enough my second generation buckfast queen had also been busy with three queen cells formed with eggs laid in them, although quite early in the process I decided to carry out another artificial swarm on the hive but again I struggled to find the queen.

On my last inspection this queen was large and plump and easy to spot due to having been marked earlier in the season. Finally I found her, slimmed down as the bees prepare her for swarming and flight, I popped her into a ‘queen clip’ designed to hold the queen due to her greater size but allowing free movement of smaller worker bees, anyway she walked straight out so it definitely wasn’t my imagination that she was slimmed down! Once she was found again, the artificial swarm was a textbook exercise and I left the queen with three frames of brood and food and a few workers on drawn comb as all the returning workers flying that day will join her, along with those that fly from the daughter hive the following day.

Now its a case of sitting back and counting the days until I check the hives to see how the new and old queens are  getting on and also keeping an eye out for the occasional swarm from Paul’s Warre hives.

Hives after artificial swarm - one has all 'non-flying workers', brood and honey, the other the artificial swarm

Hives after artificial swarm – the nearest one has all ‘non-flying workers’, brood and honey, the next nearest to the right houses the artificial swarm

I hope you have enjoyed reading the blog,  feel free to contact me with comments, suggestions or general feedback, click on the right column to subscribe and receive updates when I next have the time between chasing the bees to write again.

I can also be found at @danieljmarsh on twitter or British Beekeepers page on Facebook.

Dan

N.B. clicking on the images opens a higher resolution image in a new window.

Bees on veil during an artificial swarm

Bees on my veil during an artificial swarm, people often ask if it bothers me – flying stinging insects all around my face – the answer is NO until they find a way in – always buy a good bee suit!

April arrives and the first apiary check of 2013


Strong colony

Strong colonies emerge after a very long winter

After a very long drawn out winter with bitter easterly winds and one of the coldest March’s since records began we have returned to an Atlantic airflow and finally begun to see  the thermometers rising with the milder weather bringing in some sunshine along with the normal April showers but this has at least also bought on the start of spring.  With flowers appearing and trees in blossom the bees have started flying again and so at last we can go into the apiary and have a quick look inside the hives.

I was particularly keen to see how the bees were doing as I had lost one colony to starvation back in February, despite there being home-made fondant on all the hives. I had been feeding the bees since late December and had also started feeding a light syrup (1kg sugar per liter water) during the last week of March.

Healthy bees

Healthy bees fill the hives

The National Bee Unit (NBU – part of FERA/DEFRA) are still recommending the use of fondant at the beginning of April but it has been slightly warmer in Kent than elsewhere in the UK and my bees had already broken from their winter cluster, during the day at least, and syrup given in a contact feeder is much easier for the bees to use. Fondant stores well, does not freeze or ferment, so can sit on the hive until the bees need it but it requires chewing and diluting with water before the bees can use it so a thin syrup is preferable in my opinion once the bees are active.

I had not opened any of the hives, other than removing the roof to give fondant or syrup, since the last week in December when the oxalic acid was applied to try and reduce the numbers of the parasitic mite, varroa destructor, and even then the crown board is only raised for a few moments and no frames are lifted so it is always with great excitement that you carry out the first inspection of the season.

On a warm and sunny but breezy afternoon (15-16 degrees) I attended the apiary unsure of whether I would actually get the chance to look into the hives, but I wanted to remove the contact feeders, mouse guards and wood pecker protection anyway so it wouldn’t be a wasted visit. You can also tell a lot about the health of a colony just by observing the bees at the hive entrance and intrusive measures are not always required (click on the link to access a pdf copy of H. Storch’s book of the same title). I wanted to see if the bees were flying and if they were returning loaded with pollen as they had been on previous days.

At the hive entrance

At the hive entrance with an entrance reducer in place to prevent early robbing

A break in the wind and we were in, I used a little smoke as the bees had been quite ‘friendly’ when I had put feeders on a few days earlier so I decided to let them know I was here this time. I prised the crown boards away from the top brood boxes where the bees had firmly fixed them with ample amounts of propolis over the winter months and was greeted with hives full of bees, really good size healthy looking colonies. The crown boards were checked to make sure the queen wasn’t on them as there are currently no queen excluders used in the hives and then, as I didn’t want to chill the brood or disturb the bees to much, I only removed a few frames from the top brood box for inspection and again was very happy to see that there were sealed brood, larva, eggs and freshly stored yellow pollen (looks like willow) in the classic brood pattern spread over several frames.

I didn’t need to see the queen to know that she had been there recently, that could wait for a warmer day, but the bees were active, looking healthy and building up numbers well with plenty of stored food so it was time to carefully close up the hives until my next visit when hopefully better conditions will allow for me to dig deeper into the hives.

Paul inspecting his hives

Paul inspecting his national hives with a big smile on his face

My bee buddy Paul was also on hand checking his hives and was pleased to report no winter losses, including his two Warre hives which have not had any intervention or feeding over the winter months, the bees are flying but we do not know how large or strong those colonies are yet. The smaller colony that had over-wintered in a poly-nuc is  doing well and I may well invest in some of these one day.

Once the hives were closed up it was time to turn thoughts towards the rapid approach of spring and inevitable swarming that will start as hives fill up and become congested. We sorted through our equipment and took stock of how many ‘spare’ hives were already set and ready to go when needed and which needed repair or new wax installed. Hopefully the warmer weather will stay long enough for the colonies to build strength in time for the main spring flowers as they arrive.

I hope you have enjoyed reading the blog,  feel free to contact me with comments, suggestions or general feedback, click on the right column to subscribe and receive updates when I next have the time between chasing the bees to write again.

I can also be found at @danieljmarsh on twitter or British Beekeepers page on Facebook.

Dan

N.B. clicking on the images opens a higher resolution image in a new window.

Pollen under hive

Pollen dropped through the mesh floor building up under the hives

April into May but where are my bees going …..


March was dominated by a high pressure system that bought unseasonably warm and dry weather across much of  the UK, continuing drought conditions were forecast for the year ahead and a hosepipe ban has been put in place across much of the country, meanwhile the bees have enjoyed early flying, foraging and the colonies have been building up their strengh.

As it was still early in the year I only carried out one inspection during the month, on a warm day, where the health of the hives, the amount of stores and the strength of the colonies was assessed. I was very pleased that all three of my colonies had survived the winter again. Two were strong healthy colonies but the other hive, named Snowdon, rang a few alarm bells as things weren’t quite right due to the sporadic and weak laying patterns and although there was no sign of the queen there was some sealed brood so I closed up the hives and decided to review the situation at my next inspection.

Workers bringing in pollen

Workers bringing in pollen between April showers

Then  April arrived and so did the the rain,  the UK met office has issued yellow warnings for heavy rain and local flooding in one or more area of the country virtually every day and the heavy rains have continued to pour out of the heavens. This wet period has not only hampered my ability to get down to the hives to check on the bees progress but it has also kept the bees in the hives, unable to collect the fresh pollen and nectar required for brood rearing and the adult bees and  they are using up the last of their winter stores  rapidly.

The British Beekeepers Association (BBKA) and National Bee Unit (NBU) have  put out a number of warnings to check supplies and feed the colonies either with fondant or thin syrup as there is a real risk of starvation. I have given 1kg of thin sugar syrup to each of the colonies this weekend again in the pouring rain as it didn’t involve actually opening the hives fully.

I am very lucky to have a ‘beekeeping buddy’ who allows me to  keep my bees together with his own bees on his forest garden. He is happy to have an occasional look at my bees  if I have been unable to get there for any reason. He rang a couple of weeks back to say he had looked in my hives and that Snowdon now had no eggs, brood or sign of a queen and the colony was very small. There was no sign of an emergency queen cell as you would expect if it was a supercedure  and it is really too early for a healthy colony to be swarming, certainly not without leaving a new queen behind.  In order to try and save the colony he added a frame of young eggs from Ogwen (my strongest colony) to see if the queen-less bees would use these to draw an emergency queen cell.

Buckfast Queen

Buckfast Queen (marked with white dot)

I carried out an inspection the following week and discovered that the bees had capped the brood without drawing a new queen cell and now to add to my problems there is a second hive, Tryfan,  also without a queen, any brood or eggs…. so where are my bees going!

Once again I added a frame of young eggs into Tryfan to see if this colony are more successful at drawing out a queen cell than the inhabitants of Snowdon had been  but we cannot keep taking eggs from my strongest queen without eventually causing her colony to weaken so this is a last shot at queen raising for both these colonies.

The first colony, Snowdon, is now quite reduced in numbers and will not survive without a queen so it is likely that I will unite this with Tryfan when the rain stops, hopefully this hive will have also created a new queen but if not then it looks like I will be back onto http://www.iwantbees.co.uk/ to order another buckfast queen – I have checked with Paynes Bee Farm and they don’t currently have any queens ‘in stock’ as it is too early in the season any but they hope to have queens from mid-May … lets just hope the bees sort themselves out in the interim period and I don’t get laying workers again…..

As ever  I would welcome any thoughts from other beekeepers as too what has happened to my queens this year or to hear from anyone who has experienced similar losses. I place supers and brood bodies over an upturned floor when removed from the hive and frames are inspected over the hive and returned to the supers with great care to avoid damaging the queens, or indeed any of the bees, so I do not think that I have dropped or damaged a queen (I have certainly never done this before!).

Incidentally following up from an entry last year where I re-queened a colony with my first ever ‘purchased’ buckfast queen,  the queen is a strong egg layer and I now have the most docile and calm bee colony that I have ever worked with (she is the queen in the picture above). The eggs that I am using to try and raise a new queen with are from this colony and although I don’t know what their honey producing potential is yet they are a real joy to work with so I would be very happy if I could raise a queen from this hive with similar traits.

Hive thefts increase … time to up security


It’s a sad fact of life but these days it seems that if it’s not tied down then it gets gets nicked and unfortunately that also includes bees and beehives. So far I haven’t personally experienced a theft but I do know people who have and when they went to check their bees they find that several hives are missing from the apiary, and it’s even sadder when people have found hives with the entrances blocked up ready to take but the the thieves have left without them for whatever reason and the bees have over heated and perished.

With the recent resurgence in beekeeping as a hobby the suppliers are finding it hard to keep up with demand and there is a a thriving market for second hand equipment (just look on eBay) and a there is also a real shortage of bees and I am sure many new beekeepers don’t ask enough questions as they are so excited just to get started on their new hobby.

It’s often suggested that the perpetrators of these thefts must be bee keepers with beekeeping knowledge but I don’t think that this is always the case, I have heard of non-beekeepers stealing supers from the  hives and braving the stings that they take in order to get the honey. It’s a hard deal for the bees, they are fighting off viral, bacterial and parasitic enemies in the hive, then there are the wasps robbing the honey and wax moths and mice destroying the combs and also woodpeckers attacking the hives during the winter months and if they survive this lot they get nicked and either destroyed or sold on to some unsuspecting beekeeper.

The iron brand

Having read several forum articles on protecting the hives, with suggestions ranging from fixing the hive floors to concrete blocks to more hi-tech solutions using motion activated cameras and alarm systems I decided to opt for the simpler solution of branding the wood components of my hives so at least they are more recognisable and therefore hopefully harder to sell on if they are stolen and this may act as a deterrent to potential thieves.

Initials burn't into the cedar

My initials burn't into the cedar

I emailed several local blacksmiths  to try and get a brand made up but received no responses at all, then I contacted a few commercial brand makers but the prices were astronomical. I eventually found a supplier in Texas who could make-up a 4 letter brand, delivered to the UK for about £35 so happily placed my order.

The brand does need quite a bit of heat to get it going – the blowtorch just didn’t get it there so I opted to firing up the wood burner and carrying out the branding in the comfort of my lounge with the results shown above.

So how can other beekeepers help to reduce the problem of theft? It’s in all our interests as you may think you are getting a bargain but then it could just as easily be your bees that are stolen next! A few thoughts are:

Only buy bees from a reputatble source, either a known supplier or from your local beekeepers association. This also helps to ensure that the bees that you receive are good tempered with a young queen and disease free and this also gives you a point of contact to return and ask those questions that will invariably come up.

If the hives appear to be marked with initials or a postcode don’t be afraid to ask where they have come from, if you are not 100% convinced of their origin don’t buy them. In fact report them to to your local beekeepers association or on the beekeeping forums (again its a sad refection on society that there seems to be areas dedicated to stolen hives and security).

The finished super

The finished super

Finally if you are offered hives marked with ‘DJBM’ let me know as they will definitely be mine!

If you have enjoyed reading this blog then please let me know, comments and feedback are always welcome!

Making mead


With the first honey extraction of 2011 complete, the honey sealed in jars and the labels now on, it led me to the question of whether to feed the honey in the wax cappings back to the bees or to wash it out and make mead. I didn’t dwell to long on this and I got the brewing gear together.

Steriliser, yeast and yeast nutrient to feed the sugar

‘Mead’ or ‘honey wine’ is literally honey and water fermented together and has historical ties to many areas around the world and it is as Wilkipedia accurately describes it ‘as the ancestor of all fermented drinks’. There are many many variations of the recipe, some include grain and fruit added during the fermentation process, and the eventual alcohol strength may range from 8% through to 18% (or a lot stronger if you distill it but making ‘moonshine’ is illegal so best left alone whilst you still have your eyesight!).

A quick google search led to several variations on mead making so I have listed here what I did and I guess I will have to wait at least a year to find out if it worked well, is drinkable or if I have created a monster …. either way I am sure it will get drunk and be tastier than the rhubarb vodka I made last year!

If, like me, you are a beekeeper you may well wish to use the honey remaining in with the cappings from the honey extraction and you need to measure the amount of honey dissolved in your liquor. The old method was to float a new laid egg in the dissolved honey and when only a piece of shell the size of an old sixpence was showing, the amount of honey was correct. Nowadays, you can purchase an instrument called a hydrometer which is easy to use and much more reliable. Personally I don’t own a hydrometer and wouldn’t trust the egg method so I have gone for the ‘make it and see how it turns out’method that may lead to a sweet or dry mead with an unknown final strength but maybe I will have a hydrometer by then. I washed the cappings in luke warm water, warm enough to dissolve the honey but not hot enough to melt the wax, I then strained it back through the honey filters to leave a very sweet honey syrup to form the base of my mead.

Liquid from washing honey cappings with 3lb of honey added

The Ingredients that I used were approximately:

3 – 3 1/2 lb. honey
Juice of 4 lemons (or 1/2 oz. citric acid)
1/2 cup black strong tea (or 1/2 tsp. tannin ).
Wine yeast (General Purpose Yeast will be suitable).
2 tsp. yeast nutrient & 1/4 tsp. yeast extract (e.g. ‘Marmite’) to provide vitamin B.
Water to 1 gal.

(S.G. approx. 1.100 = potential alcohol 13.4%)

Method:

Warm the honey in approximately three times its own volume of water, stir to dissolve (avoid burning the honey), bring just to the boil and simmer for a couple of minutes. Remove the scum. Do not boil fast as many desirable substances will be evaporated off, causing loss of flavour and bouquet.

When it has cooled, transfer the liquid to a 1 gal. glass demijohn previously well rinsed with hot water and then sterilised. Bring the remaining water to the boil and again when cool add to the dissolved honey. Add the yeast, nutrient, tannin and acid. Fit a bubbler air lock (or plug the neck of the jar with cotton wool) and leave in a warm place to ferment.

Mead bubbling away in a warm place

Within a few hours the fermentation process will have started with bubbles and froth appearing.

When fermentation is complete (when there are no more bubbles and it has begun to clear – possibly after 1 month), siphon the mead using a length of plastic tubing (or carefully decant) into a clean jar leaving the sediment behind and top up with clean water to within three fingers of the neck.

When another deposit has formed, siphon again.
When it no longer throws a sediment and is clear, bottle. If necessary, filter or add wine finings. Be careful as bottling too early can lead to disasterous results! The final mead should be clearer and inviting to drink.

The above recipe should produce a dry mead containing about 13% alcohol. If the finished mead tastes rather sweet, delay bottling until you are sure fermentation has finished to avoid burst bottles. A medium mead would need about 4 lb. honey and a sweet (or sack) mead 4 1/2 lb.

Sultanas give extra flavour, body and smoothness to mead and nourish the yeast. Rinse 12 oz. sultanas in warm water and chop or mince. Ferment on the pulp, stir daily, and strain after 10 days.

The  mead should be drinkable after a year or so. Having made mead, don’t be impatient to drink it – there is no comparison between young mead and the matured article. Brother Adam of Buckfast Abbey recommended maturing mead in sound oak casks for a full seven years before bottling but I am not sure that mine will last quite that long!

More honey will increase the specific gravity, more water will lower it.

2 lb. honey in 1 gal. gives S.G. 1.060, potential alcohol 7.8%.
3 lb. honey in 1 gal. gives S.G. 1.090, potential alcohol 12%.
4 lb. honey in 1 gal. gives S.G. 1.120, potential alcohol 16.3%.

Dry Mead: Starting S.G. 1.085-1.105. Finish S.G. 0.990-1.000.
Medium Mead: Starting S.G. 1.105-1.120. Finish S.G. 1.000-1.005.
Sweet Mead: Starting S.G. 1.120-1.130. Finish S.G. 1.005-1.015.

June 2011 – and the swarming season continues


It seems like the last three weeks of June have gone mad, there seems to have been a swarming frenzy with bees deserting their hives everywhere but luckily with with my friend Paul from Forest Garden Foods on board we have been able to collect and retain many of these swarms.

Swarm in a tree

My last blog explained how I carried out an artificial swarm up at one of the apiaries. There  was only the one hive there so once the artificial swarm had been carried out the risk of a real swarm occuring was very minimal, although having left five new queens cells in the hive there is always the risk of a cast (a smaller swarm leaving with the first born, or subsequent, virgin queens) but on the whole I have now left them alone to get on with re-queening, mating and re-building the colonies.

Close up of swarm in a tree

I was at work in London a couple of weeks ago and the phone rang, my wife has literally stumbled into a small swarm on the ground on the local common whilst walking the dog so Paul popped up and mopped it up, then the very next day a large swarm was seen in flight crossing a field in the Teisse Valley and settling about 200m from the out apiary there.

Again Paul bravely donned his bee keeping suit and happily collected the swarm. Two days later and one of my hives, Ogwen, decided to surprise us with a large swarm which settled in a tree near the Spa Valley apiary and Paul duly collected it into a cardboard box and re-hived in one of the the prepared ‘swarm control’ hives.

Swarm collected in a box

This new swarm stayed for a few hours before deciding to head out again, but due to a well placed queen excluder under the brood body the bees left but returned when they realised they were missing their queen, without which the colony has no chance of survival. I have been contacted yesterday and again today being requested to collect swarms but we seem to have run out of luxury bee accommodation in which to re-house the bees with all the hives now occupied. Buying additional hives right now isn’t an option so we are having to pass these on. Swarming of different colonies in the same area often occurs around the same time each year, I assume some of the factors outside of the beekeepers control that then lead to swarming are common across an area, being weather and forage availability.

The last three weeks have seen high pressure and unseasonably hot weather and as the colonies near their peak numbers life in the hives must be very warm and congested. The long dry spring has allowed the bees to work hard and bring in much nectar and the supers are filling very fast. Time to crop some honey …..

June and the swarming season has arrived!


It’s been a while since I have written anything on my bee blog – partly as I have been busy with life and partly as there has not been much to report as each colony inspection has gone smoothly (apart from the occassional sting), the bees have been very active, working hard to bring in a huge amount of pollen and nectar and the colonies have grown fast with strong queens and the hives have stayed healthy.

A check on one colony about three weeks ago revealed far more ‘play cups’ than there were present in either of the other two colonies (the early indicator of a queen cell). This colony was also collected as a swam itself last year so would have had an older queen, previoulsy driven from a hive, and it looks like the colony had decided to eject her once again and start over with a new virgin queen.

Play cell - an early indicator of swarming behaviour

The checks carried out every ten days or so by beekeepers between April and August are partly to spot these signs of swarming and queen replacement and allow enough time to try to carry out some form of preventative action to avoid losing half your bees and therefore half your work force (and the honey that they will make) as well as being a responsible beekeeper and not allowing the hive to randomly throw swarms that then become a nusiance to other people.

I checked to make sure that the old queen was still present in the hive then removed some of the play cells – this would not prevent a swarm but at least buy me back a little bit more time before they were ready to go. At the next visit, carried out 9 days later, I took along a spare hive with frames of wax made up. This would be useful for swarm control if I needed it but if the hive wasn’t quite ready to swarm I could leave it set up at the apiary as a ‘bait hive’ and then if a swarm were to happen and I wasn’t around there is still a fair chance that the scout bees, searching for a new home, would simply come across the empty hive, realise it was dry and safe, about the right size and move the colony in without my assistance.

An audience with the queen

As it was, a quick check on the colony revealed 6 new queen cells, one of which was completed and capped – that is to say the larva stage had already been fed royal jelly and then sealed in to start her transformation into a new queen.

I removed the capped queen cell as I did not know how long it has been capped for and therefore have no idea when the new queen would arrive. This left 5 queens almost ready to be capped in the hive, only one of whom would eventually rule.

Queen Cells on a brood frame

Queen cells on a brood frame


Some beekeepers would now try and split the colony into more than two hives at this stage if they were wanting to expand their apiary rapidly, but time only really allows for me to deal with three colonies at the moment so I decided to split the ‘ready to swarm’ colony into two.

An ‘artificial swarm’ works on some very simple principles of bee behaviour that 50 million years of evolution has taught them, namely that their ‘homes’ do not move (these would normally be in  a hollow tree or similar in nature) and that if the ‘flying’ or ‘foraging’ bees suddenly find themselves in an new home with no honey, brood or worker bees then they have swarmed – even if they didn’t actually leave the hive themselves.

An artificial swarm involves firstly finding the old queen in the hive, a difficult task on a damp day when nearly all 60,000 bees are at home, but luckily I had found and remarked this queen with a white dot on her back during my previous visit and so it wasn’t long before she was found and safely removed in a ‘queen clip’, a device that looks and works like a hair clip but has slots to allow the worker bees to escape but traps the slightly larger queen.

Introducing the old queen to a new hive

Once the old queen is safely held a new, empty hive is set up in exactly the same location that the old hive had been stood with a queen excluder underneath the brood box – this is a sheet of metal or plastic, again with slots large enough to allow the worker bees free passage but to small for the queen to fit through – this prevents the queen from swarming straight away again. Sheets of wax foundation are added and also a frame of honey to prevent the swarmed colony from starving is included in the new house  deal. Bees from the original colony are added to the hive and then the old queen is re-introduced to her split colony before closing up the hive.

The original hive is set up a few feet away from its original location and now left alone for enough time for the new queens to hatch, the first of which will either kill her unborn sisters or flee the hive with a small number of foraging bees and allow the second born queen to reign. Any ‘flying’ bees left in this hive will leave the hive the morning following the split to forage for food but then return to the newly set-up empty hive as it is now in the original location, so after 24 hours or so you have split the old queen and all the flying bees from all the younger workers, brood, eggs and honey and unborn queens and its time to sit back and wait.

Artificially swarmed bees

As this has all occured during the first half of June there is not much forage for the ‘swarmed’ colony and there is a very real risk that they will simply starve in the hive so I have fed them 4kg of sugar as syrup to help them pull through to the start of the summer nectar flow in July and also to stimulate the bees wax glands so that they draw out the new comb rapidly and the old queen can start laying the next generation of workers straight away.

As a beekeeper there is always the temptation to take a ‘peek’ in the hive and see if everything is going to plan or the bees are slowly starving to death but by following the artificial swarm technique you give the ‘swarmed’ bees the best chance of survival and you really have to leave them alone to do their own thing.

Expansion and a happy apiary

Something of interest as a beekeeper is that you hear of other local swarms, and my wife even found one whilst walking the dog on Tunbridge Wells common this week,  it seems that bees really do all have one unique body clock in an area and seem to know exactly when to swarm at the same time, almost as one body. Well worth noting down for next years swarm control!

Without the preventative measure of the artificial swarm it is almost certain that my bees would have gone at the same time and unless you are there to witness it and catch and re-hive the swarm you stand to lose approximately  20,000 bees each time. Luckily on this occassion it looks like I stopped it in time and subsequent visits to the ‘swarmed’ hive to feed syrup have indicated a very full and lively hive (and another sting on the elbow and swollen arm!) and I am really looking forward to seeing how the colony expands during the sumer before the long autumn amd winter period spent in the hive.

A sting in the face – a photo report just for your entertainment


Many people have a deep seated fear of insect stings, whether it is from a bee or a wasp, they suspect deep pain followed by a near death experience, or worse, and I guess for a very small group people this could be a reality. However there are only about 4 anaphylactic related deaths in the UK each year so it really is very unlikely to be you!

Like most bee keepers I expect to get stung occasionally, and I do, mainly in the hands or lower arms and I get very little pain, the sting itself  is removed reasonably quickly and I do not tend to have much of a reaction at all, not even the normal swelling, redness or itching that most people experience.

Normal bee sting reaction as modelled by my wife

However recently following an apiary meeting with the Kent Beekeepers Association, I was enjoying a cup of tea and a slice of cake at the apiary when a bee decided to smack me one of the upper lip. Due to the location of the sting and not being able to see beyond my nose and through my stubble it took about 2 minutes to remove the stinger so I got a reasonable amount of venom injected which led to my transformation into the elephant man.

I have added a few pictures below to give some idea of the level of reaction you get in the face, being a far more sensitive area of the body to be stung and the result of the histamine being produced by the bodies own immune system  to counter the small amount of venom injected! Click on the photos to open and enlarge ….. and enjoy

45 minutes to 16 hours of reaction after being stung in the face

The photos show that the immediate response to the venom was for my upper lip to ballon, and keep going, and going. The lip then started to deflate but the reaction moved up my face with swelling in my right cheek and under both of my eyes.

26 hours to 72 hours after being stung!

The reaction to the sting was still quite evident in my face, even after three days. There was no pain or itchiness with this, on the second day my gums felt numb as if I had been to the dentist but this soon passed over and I soon forgot about the way I was looking although I was reminded on a regular basis by everyone that I met!